Guide to Resolution and DPI Issues
It can be confusing at first to have a file rejected by your website designer or advertising publication for not having sufficient resolution and/or dpi. This guide is for those who are confused by these terms and will fully explain to you in detail what they mean, the effect they have on your files and how to tell.
All digital images have two variables that can cause them to be unsuitable for purpose:
Resolution
The total number of pixels
Resolution is a term that most people are familiar with. The term is used as a specification for PC and laptop screens, TV screens, digital images and resolution is ultimately what is being referred to when you hear the term ‘megapixels’.
Resolution stands for the number of pixels (dots) that comprise an image. A pixel is a tiny square that can best be visualised as a single tile on a mosaic. This is actually a simple way to describe how all screens work, the image you see on screen is just a very large mosaic comprised of many pixels which are normally too small to see unless you really peer at your screen. Over time screens have grown larger to accommodate more pixels for the very reason that the more pixels you have on screen, the better the detail of the image.
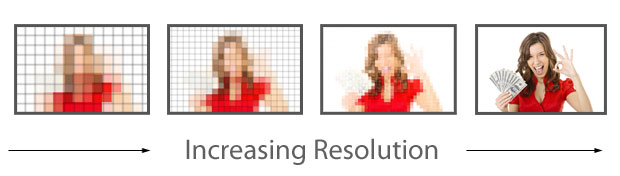
If a TV screen had only 4 pixels, you would be looking at 4 squares changing colour to reflect an image and you wouldn’t be able to work out what it is. If we put 20 pixels on a screen, things would get better but it would look close to the display on a calculator or old blocky arcade game. If we place several thousand pixels on a screen, we have far more blocks comprising the picture and fine details will be visible. This is why HDTV is a success because the images are much clearer (hence High Definition) and they pack more pixels onto their display than a non HD television of the exact same size. You can see this happening in the example above, as you increase the pixels, you increase the effective quality of the image.
D.P.I, Dots per inch
How many pixels to print on an inch of paper
This will be where the largest misunderstanding will arise causing files to be rejected. What this refers to is how many dots fit into a square inch of printed paper or simply, how many tiles we are using in the mosaic per inch.
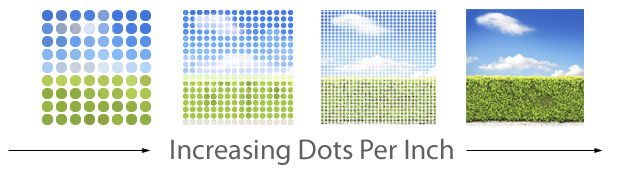
To attain a high degree of print sharpness, a printer will look to have a minimum of around 200 dots per inch printed on the paper. Paper works exactly like a screen, it is also a mosaic. The more dots we have on the paper, the higher quality and effective sharpness of the print.
During the print process the actual printer is laying down dots of varying coloured ink that will appear as dots through a magnifying glass but when viewed at normal viewing distances they will merge together to appear as a crisp image.
Now that we know the two variables affecting our files we need to understand how we can work out if we have the correct resolution or dpi to prevent our files being rejected by your graphic designer or printer!
Files for the Web
When it comes to finding the appropriate resolution for an image you have to consider what the final output of your work will be. For your website you would be viewing your files on a screen. All screens have varying resolutions. Over time screens have commonly grown from pixel dimensions of 640×480, 800×600, 1024×768, 1280×1024 and then wide screen monitors appeared giving 1440×900, 1680×1050 and then we reached HD at 1920×1080 and many screens push higher than HD to resolutions such as 2560×1440 and soon to come is 4800×2560.
The varying resolutions of screens mean that website design has had to grow to accommodate these trends and websites have gotten wider. If we assume we are dealing with a website that is 960 pixels wide then this means that if you have a banner stretching across the top of your website that is 960 pixels in width, any images you use should be 960 pixels wide or larger. If you have an image that is only 200 pixels wide then this is where you face having your image rejected as being ‘low resolution’.
It is small but can it be enlarged?
Surely you can just make it bigger? Technically yes this can be done but as long as you remember that each image is essentially a mosaic. When you make the mosaic bigger, the tiles all get bigger and when the tiles get bigger the quality goes down and pixels become noticeable. Quality comes from having more pixels, not less so when you enlarge a 200 pixel sized image to 960 pixels you are making each pixel almost 5 times larger. What this causes is an effect called ‘pixelation’ where the image appears fuzzy, blurry or jagged and pixels become visibly noticeable. It is for this reason that you will have your file rejected because the website designer or advertising agency does not want to use a poor quality image that is pixelated.
![]()
To combat this you should always ensure that the images you are using are the correct size to start with and you can do this by right clicking on the image and going to Properties and then Details. This window will tell you the resolution of the image and if it is less than the size that your graphic or website designer requests, it will very likely get rejected and cause pixelation.
Files for Printing
Print is the area where images get rejected for having insufficient dots per inch.
A pixel has no set physical size. This means when looking to print an A5 image, each pixel cannot be converted to a scale such as millimetres in order to determine its printed size. To determine the printed size you need to know the resolution and also the dpi of an image which is how many of those pixels will be printed on an inch of paper.
- A 1000 x 1000 pixel image, at 72dpi would print out at 14 inches by 14 inches
- A 1000 x 1000 pixel image, at 100dpi would print out at 10 inches by 10 inches
- A 1000 x 1000 pixel image, at 200dpi would print out at 5 inches by 5 inches
- A 1000 x 1000 pixel image, at 300dpi would print out at 3 inches by 3 inches
This is how printing on paper works. Screens and websites do not work this way and contrary to what you believe, a 100dpi image will look the exact same on your screen as a 5000dpi image! Screens only require that the image resolution to be sufficient. Print always relies on resolution and dpi.
Can it be enlarged or scaled up?
Again, similar to website images they can be enlarged but this will only serve to further reduce the image quality if the dpi was not sufficient to start with.
How can you tell what the DPI is?
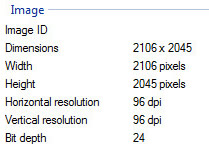 You do this by simply right clicking on the image and going to Properties and then Details. You will see properties called horizontal resolution and vertical resolution. Some files may not have a dpi set and this will be determined when you go to print. The example to the right is set at 96dpi.
When printed at 96 dpi the image would be (2106/96) by (2045/96) which is 22 by 21 inches roughly.
If your printer or graphic designer was sent this file and they specifically requested that the image be provided at 200dpi to fit a print of 22 by 21 inches they may reject it as insufficient dpi.
They can try to resize the image but the height will shrink to accommodate the increase in dpi like so: (2106/200) by (2405/200) which now gives an image of 10 by 12 inches which is too small and will be of low quality and likely rejected.
Images always seem to be 72 or 96 dpi?
This is the main cause of insufficient dpi, if you are using Google images to save pictures and use for print you’ll come across the fact that most of the images appear to be just 72 or 96 dpi and the printer needs larger pixel densities.
Without delving too deep into file types, images for the web tend to be defaulted at 72 dpi. DPI is not required for web usage but in the past there was an attempt to form an industry standard by Apple to create a one to one ratio with screens and print and because there are 72 points to an inch, 72 dpi became the accepted choice. This idea did not take off but it is the reason why 72dpi is common for website images and 96dpi was the PC equivalent and software such as Adobe Photoshop still sticks by this rule.
This explains why it is difficult to find high quality images for printing when using search engines such as Google Images. (Which is also a habit that can get you into major trouble) When you use stock sites such as iStock Photo you will be able to download images suitable for print.
Working out the Resolution required for a given DPI
You will nearly always be told what the minimum dpi is that your printer requires and you will also know the size of your print. (A list of common paper dimensions can be found here)
If you need an image to cover the print area of an A5 flyer which is 8.3 x 5.8 inches and your printer wants images to be 200dpi minimum it is very easy to do…
Simply multiply the desired size in inches by the dpi required. (8.3 inches x 200 dpi) by (5.8 inches x 200 dpi) which is 1660 pixels by 1160 pixels. If your image is smaller than this for example 640 pixels x 480 pixels, your image is not fit for this purpose and will be rejected.
Tip: Always use the largest resolution image you can find, images scale down perfectly but never scale up without losing quality unless they are vectorised files.
So the next time you are told your image is not high resolution or your document has insufficient dpi to print, now you know why.